Wednesday, May 11, 2011

Time For Tea!

Ever had the British tradition of afternoon tea?  My girlfriends and I absolutely love taking some time off, putting on nice sundresses to have a tea party!  Even my boyfriend is getting into the tea grove.  And what's not to love?  Terrific teas, scrumptious scones, and savory sandwiches all adorned with one of a kind teapots and matching teacups.  And while the the royal marriage of Will and Kate still grace the covers of magazines and newspapers across, I thought it would be nice to find out a little more on such a tradition that caught on so quickly here in the states.  So whether or not you've had tea time, here's a little history of how afternoon tea came to be!  And maybe it might get you curious enough to go out and venture on this great tradition!


First off, though the tradition of "taking tea" originated from the British Empire, specifically England, it is practiced in the United Kingdom, Australia, New Zealand, Belgium, France, Switzerland, and of course in the United States.


In the U.K., there are two types of tea time -- afternoon tea (a.k.a. low tea) which is eaten between 3-5pm, and high tea (meat tea) which an early evening meal that is eaten between 5-6pm.  Afternoon tea usually consists of finger sandwiches, primarily with cucumber, egg, ham or smoked salmon, scones with jam or clotted cream, and various cakes or pastries, all served in a three-tiered serving dish.  High tea, however, would consist of cold meats, egg or fish, cakes, and sandwiches.


Many Britons today no longer have the time to take a break mid-day to enjoy a formal tea time.  Instead, they take a simpler take on tea time that consists of tea and biscuits. 


In other parts of England, as well as Australia and New Zealand, "tea" often refers to the main evening meal which is "dinner."  In France and other French-speaking Europe, tea time is called "le gouter" which basically means 4pm afternoon snack.  Le gouter is usually for kids coming home from school and consists of a baguette with butter and jam or other spreads, hot chocolate or juice, and never with tea or coffee.  "Gouter" for adults would consist of pastries and alcohol, only served after 7pm.


As for the United States, tea time is regarded as a formal gathering where tea, finger sandwiches and little cakes are served on the best china.  You can find afternoon tea served in high-end hotels and the much popular teahouses.  Though most high tea are very formal, there are teahouses in the states that are much more informal and playful.

Now that you know what afternoon/high tea is, here are some some great tea houses to try out! (In Random Order)

1. Tyme For Tea -- Fremont
They have hats for you to borrow and wear during your tea time experience!  Plus, a vintage shop right beside the dining area.

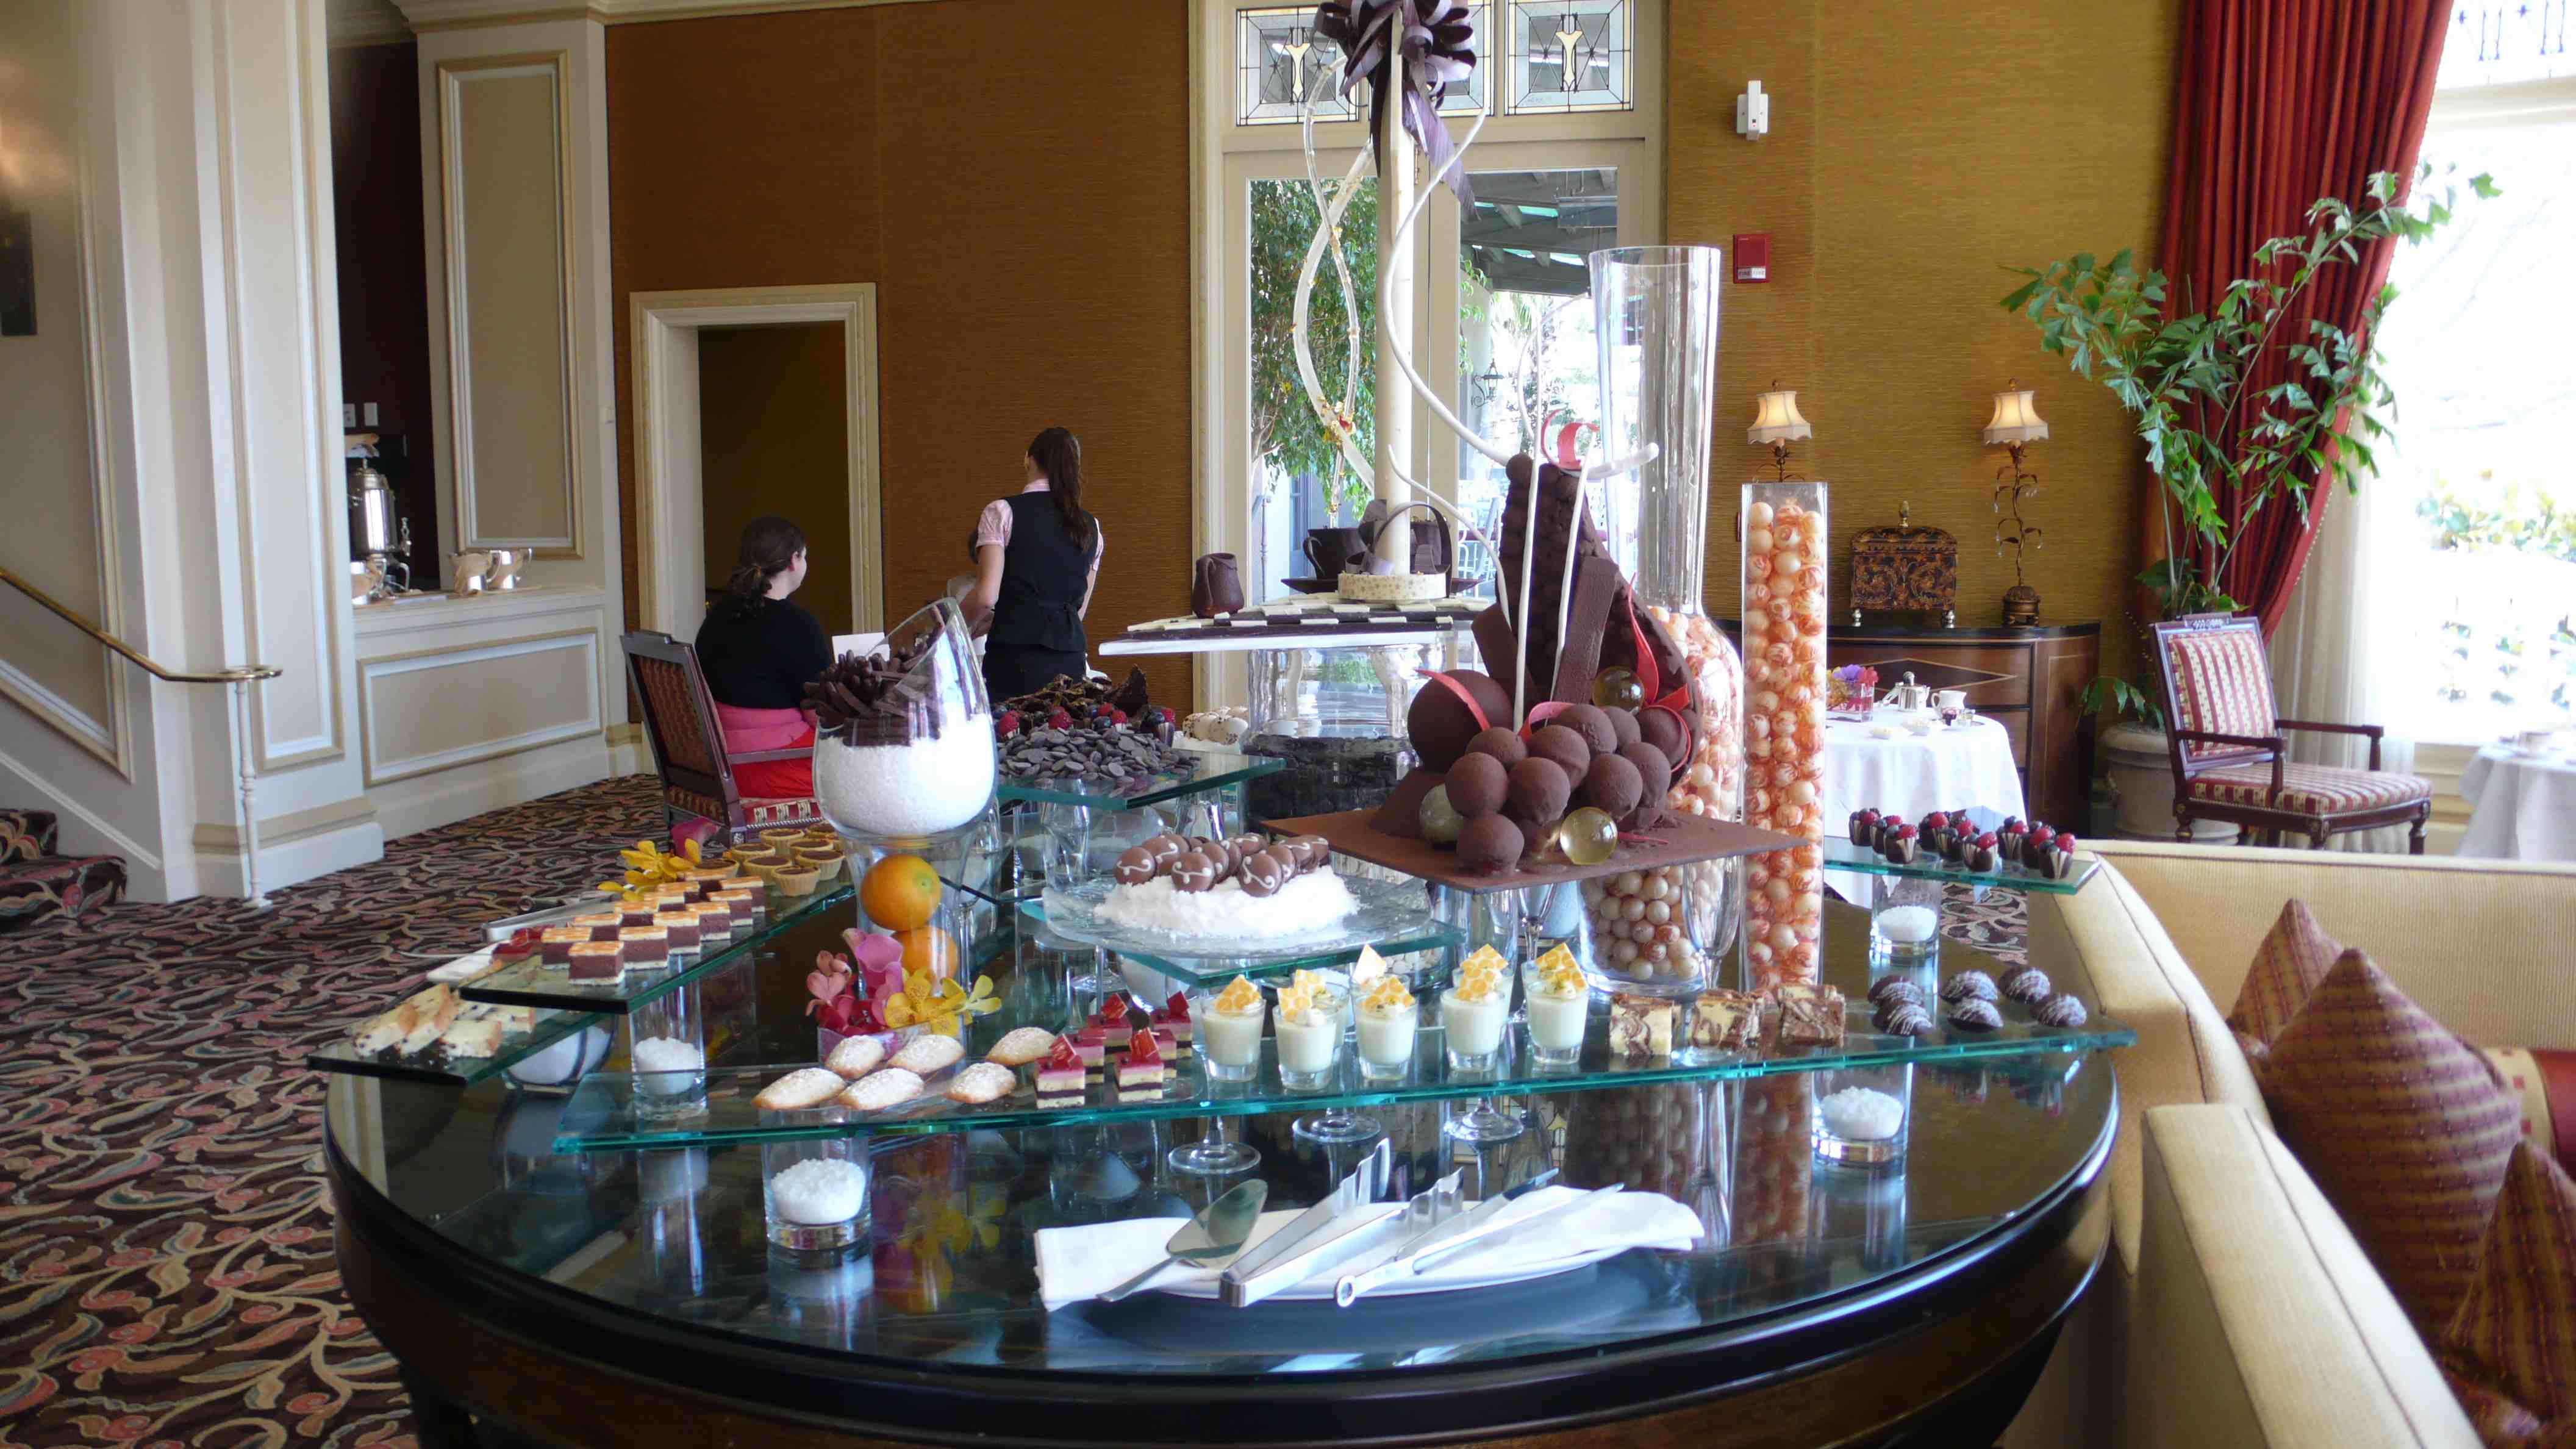
2. Langham Huntington Hotel, Pasadena -- Chocolate Afternoon Tea
My ultimate favorite!  Probably one of the most expensive afternoon teas out there at $59 per person, but it's soooo worth it!  Let's just say, there's an all-you-can-eat dessert buffet (pictured below).  Oh, and did I mention, everything (from sandwiches to tea) all contain chocolate!! YUM!

The following are on my to-try list:
1. DarTeaLing Lounge -- San Francisco


2. Crown & Crumpet -- San Francisco

3. Lovejoy's Tea Room -- San Francisco


NOW GO GET YOUR TEA ON!! :)

p.s.  don't be afraid to bring your man along...he's gonna enjoy more than he will admit. ;]

Thursday, May 5, 2011

A Cake Made for Royalty

It's officially been a week since I stayed up till three in the morning to catch the Royal nuptials wishing I, like every other girl in the world, was the lucky Kate...or should I say Katherine... Middleton. But now that I have come back down to reality, it's time for some cake talk!


Though gorgeous as Will and Kate's actual wedding cake was, with it's 900 sugar-paste flowers, it was just a simple fruit cake.  What caught my attention and curiosity the most was the groom's cake -- a chocolate biscuit cake.


Before the Royal wedding, I have never heard of a chocolate biscuit cake. But it was garnering so much hype I couldn't help but be curious.


So after much digging and skimming through our awesome free internet database, a.k.a. google, I found out what a chocolate biscuit cake really is and how to make one.


So basically, the name of the cake says it all.  It is literally made up of chocolate, tea biscuits, and more chocolate.  And I found the perfect place to learn how to make it.


The following recipe comes from Sense and Simplicity blog.


Ingredients:
4 tbsp (60 ml) unsalted butter, at room temperature
1/2 cup (125 ml) granulated sugar
4 oz (11o g) dark chocolate, chopped
1 large egg, beaten
8 oz (225 g) McVitie's Rich Tea Biscuits, about 28 biscuits broken into almond-sized pieces
8 oz (225 g) dark chocolate, chopped - for the icing

Method:
1. Line bottom of 7-inch (18 cm) springform pan with parchment paper and butter sides of the pan.
2. Cream butter and sugar until fluffy using electric mixer on medium setting.
3. In double boiler melt 4 oz chocolate.
4.  Stir in butter mixture.
5.  Stir in egg.
6.  Remove from heat and add biscuits, stirring until well mixed.
7.  Spoon mixture into springform pan filling all gaps and refrigerate for three hours until set.
8.  Remove pan and turn cake upside-down on cooling rack set over a parchment lined baking sheet.
9.  Melt 8 oz chocolate in double boiler.
10. Pour the melted chocolate over the cake, smoothing it on the top and sides.
11.  Let stand for one hour until set.
12.  Carefully remove cake from the cooling racks and place on serving plate.
Serves 8


I still have yet to try this recipe, but when I do get the chance, I'll let you guys know how it goes!  Till then, if you get the chance to try this before I do, let me know how it turned out!

Tuesday, May 3, 2011

Sherbet, Sorbet -- to-MAY-to, to-MA-to??

The sun's shining, the wind's breezing by, and there's not a cloud in sight!  So what to do on a gorgeous and almost rare day like this in San Francisco?  I say, "Off to Delores Park and get some ice cream on!"  And I'm sure, if you ask every San Franciscan here what ice cream they prefer, it's gonna be a death match between Bi-Rite's Creamery and Mitchell's Ice Cream.

In my personal opinion, I think I prefer Mitchell's Ice cream.  Not only do they exotic flavors that you won't find anywhere else (not even in Bi-Rite,) but the availability of flavors are consistent.  Which brings me to my next point.  Although Bi-Rite has some unique flavors like Balsamic Strawberry, the famed Salted Caramel, and some other brainy concoctions, the availability of flavors alternate.  

My favorite from Bi-Rite is Earl Grey--which they don't always carry--and I hate nothing more than to wait 45 minutes in line only to find out that it's not there.  So if you like your ice cream like your men...or women... quirky, one of a kind, and consistently available, then go for Mitchell's.  But if you're in the mood for spontaneity, off to Bi-Rite you go!

Anyhoo, moving on the today's subject... Ever wonder what the difference between Sorbet and Sherbet??  Not to mention how to pronounce it?

First off, sorbet is pronounced SORE-BAY.  But sherbet is a whole other story.  Many people will argue it's pronounced sher-bert.  Even I will plea guilty to that.  But in all actuality, it's pronounced SHER-BIT, like hermit.  I think I'll keep calling it sher-bert.

Now on to cracking the code -- what's the difference??  Sorbets and Sherbets are in deed very similar to each other in texture and consistency.  However, the key difference is one contains a little dairy whereas the other doesn't.  Can you guess which one?  Probably not.  Well, both sorbets and sherbets contain pureed fruit, sugar, and water.  Both also has an icy consistency.  However, sherbets are the ones that contain a bit of dairy in it.  According to HowStuffWorks.com, "In fact, most brands of sherbet sold in supermarkets contain from 1 percent to 2 percent milk fat or cream."  Crazy huh!  And because sorbets don't ever contain dairy, it has softer consistency.

So if you're lactose intolerant, definitely go for sorbets!

Wednesday, April 27, 2011

Carrot Cupcakes for the Easter Bunny

How was everyone's Easter?  I bet everyone enjoyed a little time off from their hectic lives.  I know I sure did!  Working in retail, the only days that the mall closes are Christmas and Easter.  So you can only imagine how ecstatic I was to get my first Sunday off in...FOREVER!


Can you guess what I did on my down time?  Here's a hint: I only did what every other aspiring baker would do on their time off -- bake!  Now can you guess what I made?  Another hint: what comes to mind when you think of bunnies?  If your guess was carrots, you get a golden star!


Since most people associate Easter with painted-cover eggs, chocolate, and the Easter bunny, how fitting it would be to make carrot cupcakes for such a holiday!  So that's what I made: Carrot cupcakes with chunky cream cheese frosting.


To begin, here's what you're gonna need:
- 4 eggs
- About 2 cups of sugar (depending how sweet you want your cupcakes)
- 1 cup canola oil
- 2 cups all-purpose flour
- 2 teaspoon ground cinnamon
- 1 teaspoon baking soda
- 1 teaspoon baking powder
- 1 teaspoon ground allspice
- 1/2 teaspoon salt
- 3 cups grated carrots (about 2-3 sticks of carrot)


First off, line your muffin pans, preheat your oven to 325 degrees, and grate your carrots.  Grating the carrots is gonna take a while, and your arm is gonna be tired.  But it's best to do this first so your mixtures won't be sitting out.  Now beat the eggs, sugar, and oil together in a large bowl.  
Next, combine the flour, cinnamon, baking soda, baking powder, allspice, and salt.  Now I recommend combining these dry ingredients in a gallon zip lock bag.  Why?  First, it saves cleaning dishes; two, it's so much cleaner and easier to pour it into the wet mixture later.
Now you can gradually add your dry mixture to your wet mixture.  Once that's all incorporated in, you can then STIR in the carrots.


Fill your muffin cups 2/3 full.  Trust me when I say 2/3!  If you fill it just under the rim, your cupcakes are gonna look like mushrooms -- though cute, the edge of the cupcake paper is gonna get stuck underneath the muffin tops which would make it difficult to peel.  Bake it for about 20-25 minutes or until a toothpick inserted in the center comes out clean.  If you're making mini cupcakes, it should take no longer than 20 minutes, depending on your oven.  If you're making regular-sized cupcakes, 25 minutes should be just right.  But a baker's rule of thumb is to always check your goodies at the least amount of time stated.  It's better to stick it back in the oven than to have burnt treats.
Cool for 10 minutes before transferring them to wire racks.


And now for the frosting:


Now the secret to making these tasty treats so tasty is in the cream cheese frosting.  I don't know about you, but I think buttermilk frosting destroys perfectly great desserts.  It's way too thick, too sweet, and too boring!  If your dessert is already sweet, why not mix it up a bit and balance the sweetness with something a bit more tart?  Wouldn't you agree?


Anyhoo, I spiced up the cream cheese recipe a bit my adding chopped pecans, raisins, and a touch of coconut flakes for texture.


What you'll need:

- 1 package 8oz soft cream cheese
- 1/4 cup of softened butter (1/2 a stick)
- 1 1/2 cups of powdered sugar
- 1/4 cup flaked coconut
- 1/2 cup chopped pecans
- 1/2 cup chopped raisins

In a large bowl, beat (with a handheld or with a flat beater) cream cheese and butter until it's fluffy and not so thick.  Gradually beat in the powdered sugar until it's smooth and fully incorporated.  WARNING: start off with a lower setting then to a higher setting.  If you beat the mixture with a high setting right off the bat, you'll get powdered sugar in your face and all over your countertops.  Don't say I didn't warn you.  Moving on, Stir in the coconut, pecans, and raisins.

If you're ready to devour them, frost your cupcakes and store them in the refrigerator for no more than two days.  Any longer and you might dry out your cupcakes.  But if you're not ready to eat them quite just yet, or saving it for your Royal wedding party, store the frosting in the fridge, and store your cupcakes in a tupperware in room temperature.  But my advice is to hold off eating your cupcakes right away.  The frosting tastes and holds much better when cold.  Especially if you over beat your frosting and it looks a tad runny, it will take hold once you throw it in the fridge.

Thursday, March 17, 2011

Green Velvet Cupcakes?!?

That's right!  You heard correctly!


In honor of St. Patrick's Day, I have experimented with different combinations of recipes to come up with this one.  And let me just say, after THREE attempts, I finally got it right...or at least I hope I did.


But before we get into my ordeal, let's back track a little bit and find out how St. Patty's day and its infamous green came to be.


To keep it short and sweet, March 17th was named after the most common and esteemed Saints of Ireland -- Saint Patrick.  Why March 17th?  Well, that's when he died.  It is originally suppose to be a Holy Day of Obligation -- the faithful have to participate in Mass.


Today, St. Patrick's day is widely known for getting drunk and being pinched if you're not wearing green.  So why green?  Surprisingly, blue was the color of Saint Patrick.  But because Saint Patrick often used and wore shamrocks to explain the Holy Trinity, it quickly stuck on.  


Now imagine if the color blue stayed...the Chicago River would be dyed blue.  But what's the point, if that's what color it is already.  Boring right?


So moving on...


For St. Patty's day, I wanted to make some yummy cupcakes that I could share with my classmates and coworkers.  And since Red Velvet cupcakes are so popular, I figured, "Why not make GREEn Velvet cupcakes!"  Now if you didn't already know, Red Velvet cupcakes are basically a white cake mix with red food coloring topped with cream cheese frosting. 


So the first recipe I tried, I found from the Food Network website.  This recipe, though beautiful in color in the end, tasted utterly bland, not to mention dry as the Mojave desert. I was so completely shocked at the results.  You would think if it came from the Food Network, it must be good. Big NO!  It was so horrible, I had to throw it away.


After attempt #1, being that I'm not a big fan of plain old white/vanilla cupcake anyways, I changed it up to green CHOCOLATE velvet. So here comes attempt #2.


What went wrong?  I accidentally put 1 tablespoon of baking powder instead of 1 TEASPOON.  And to add to it, the second recipe I found in one of my cookbooks did not call for enough sugar.  So not only was it not sweet enough, it had a bitter after taste from the baking powder.  TRASH.


Attempt #3?  Much, much better!  This recipe is from Food.com and it is oh so moist and just enough chocolatey goodness.  What makes this recipe different?  Much more water, cocoa powder, no buttermilk, and no eggs.  Though the texture is crumbly, the difference in water (and perhaps no eggs) definitely makes the cake moist, soft, and fluffy -- which is way better than solid and dry.  


To give these cupcakes its St. Patrick's day flare, I added 2 tablespoons of green food coloring to the cupcake batch, 2 drops of the food coloring into the cream cheese frosting, and topped it off with green sprinkles and Lucky Charms shamrock hats.  But beware, wear gloves and an apron when dealing with the food coloring as it can get stained on your skin and nails.  I did, however, find acetone nail polish remover to work pretty well.  I can't say for the counter tops though.


Here's the final product..voila!


Side note:  The easiest and neatest way to top the frosting is to put it all in a gallon zip lock bag, cut a teeny tiny hole in the corner and squeeze away.  I found it neater to frost it in a circular motion and pulling away at the top.  For those of you fancy bakers, you could use a piping bag and an 1/4 inch tip.

Happy St. Patrick's Day!

Wednesday, March 9, 2011

Nuts for Peanut Butter!

Ever wondered how this irresistible gooey creamy goodness of peanut butter came to be?  It all began where all things basically started (or so it seems in movies) -- the Aztecs.


The Aztecs had originally used pure roasted peanuts to concoct this paste. Whether they ate it or used it for some other purpose is unclear. We don't know what the Aztecs actually did with peanut butter but they are credited with inventing it. However, we can't give the Aztecs all the credit. Their peanut butter was very bitter and very difficult to work with. It wasn't until George Washington Carver (the scientist...not the president) came along and mixed the peanut paste with sugar and sweet molasses that we got the familiar flavor we know today. It wasn't until someone added vegetable oil and made it...wait for it...SPREADABLE! [ooooh! ahhhh!], that we got the modern Jif and Skippy brands so popular among school children today.


So what is it about peanut butter that makes kids go crazy when paired with jelly/ chocolate/ nutella? Or that it makes dogs smack their tongues relentlessly while we sit back and watch, laughing hysterically? Is it because of it's high in protein or antioxidants?  Is it because it can prevent cancer?  Or is it just because it tastes so damn good?  Who knows!  But really?  WHO CARES!


In honor of this creamy goodness, I decided to make some peanut butter cookies from a recipe I found in one of my cookbooks.  This recipe is EXTREMELY easy.  Don't be surprised of the short list of ingredients...the result will be yummy and wholesome :)


What You'll Need:
52 Hershey's Kisses
2 cups of peanut butter (About a jar and half)
1 - 1 1/4 cups of sugar
2 eggs


In a large bowl, cream the peanut butter and sugar until it becomes light and fluffy.  If you're using a Stand Mixer, I did it with the flat beater on the 6th power for about a minute and a half.  
Now add the eggs, one at a time, making sure it's well beaten into the mix before adding the next.  The dough will be sticky but should fall right off of the flat beater.
With floured hands, roll tablespoonfuls of the dough into balls.
I put the dish of flour in the sink to flour my hands to avoid any flour mess on the countertops.  Place your rolled balls of dough 2 inches apart on an ungreased baking sheet.
Bake at 350 degrees for about 14 - 16 minutes or until the tops have cracked.  Now I must warn you, if you're gonna do what I did and place two baking sheets on the top and bottom rack in the oven, I highly suggest switching them halfway between baking.  But if you want perfect cookies, play it safe and stick with baking one batch at a time on the middle rack or top rack.
While your cookies are baking, now would be a good time to unwrap all those hershey kisses so that they would be ready to place on the cookies right when it comes out.  Also, to add my own flare to the recipe, I used Milk Chocolate, Dark Chocolate, and Almond Kisses to give a little variety.
When the cookies are done, immediately press the Hershey Kisses into the middle of each cookies.  Move to wire racks and let semi-cool before serving.  Usually, you would want to cool these cookies completely before serving as it is a little fragile.  But personally, I think the cookies are better when the chocolate is still gooey.  Here's what the finished product should look like...
Add a cup of ice cold milk and this would a perfect treat for that midnight craving and afternoon snack.  Enjoy! :)


And just for kicks...here are some great uses to Peanut Butter:
1. Plumpy'nut is a peanut butter-based food used to fight malnutrition in famine stricken countries. A single pack contains 500 calories, can be stored unrefrigerated for 2 years, and requires no cooking or preparation.
2, You can make a simple bird feeder to hang outside your house.  Just coat a pine cone with peanut butter and cover with bird seeds.
3. A great home remedy to remove gum from your hair!
4.  For those pesky mice in your home, peanut butter works better than cheese

Tuesday, March 1, 2011

Sorry for the absence...

I apologize to readers..and my one follower...for my lack of blogging the past week or so.  I've been bombarded with a severe case of the sinus infection.  It all started last thursday...


I had been having a steady runny nose (allergies?) for couple weeks already.  But that Thursday morning, I woke up with a little cough thinking it was just the super cold weather constricting my lungs.  Having a history of asthma, I brushed it off thinking the cause was the cold weather and it would soon go away.  But as I got to school, an elephant was sitting on my chest and I could barely get a breath in, and before I knew it, I was hyperventilating.  So on to the Student Health Urgent Care I go.  After an hour or so breathing into a paper bag and going on the albuterol drip, I finally started to feel better.


Then friday morning came around and that elephant came back and the cough had worsen.  To play it safe, I went to go see my primary doctor.  Turns out, I had bronchospasms -- my lungs like to constrict whenever it wants causing me to cough and feel extremely week and tired.  The treatment?  Huffing and puffing out of my inhaler three times a day until the cough subsides.


Come Saturday, I was feeling like tip top shape again so I decided to take my mom to afternoon tea filled with buttery, flaky scones, savory sandwiches, and exotic teas imported from around the world.  Nearing the end of our afternoon delight, my breathing starting to weigh me down and it was as if all the energy got sucked right out of me.  Thinking that I was just tired, I took a nap.  Once woken up, instead of feeling refreshed and bright-eyed, I felt like the living dead.  I could not force myself to eat as my runny nose was acting like an overflowing faucet.  It was non-stop sniffling and blowing.  I would have been casted for a Kleenex commercial.


That night, as I was trying to fall asleep, something wasn't right.  So I woke my dad up and my parents took me to the emergency room.  We got there around 12:30 in the morning and as my mom and I were walking through the ER, I had supposedly fainted.


Somewhere in between arriving at the ER and being knocked out with some super strong narcotic, I had been screaming in pain.  I had a headache that was worse than a migraine... my head felt like it was about to explode.  Seeing how much pain I was in, the docs drugged me up and took me on my way to a head CT scan.  And that's when they found it.  A sever sinus infection that had spread all over my forehead and both sides of my cheeks.


After 7 hours in the emergency room, I was finally discharged.


It's safe to say that we caught the infection early enough to where there is no harm done, other than my extremely painful migraine and what nots.  Let's hope these super strong antibiotics are effective, cause if not, I'm gonna need surgery to remove those infections.


There are times where I feel ok enough to eat, talk, facebook...but then there are times where I feel like death -- extreme hot flashes, cold sweats, shortness of breath, extreme stomach pains from the antibiotic, nausea, and dizziness.  For now, I gonna be glued to my bed as much as I can.  Walking around is the worse, so I definitely gotta take it easy for the next couple days.


Until then...stay warm, stay dry, and stay healthy.